Image Map

Facebook Pinterest Twitter Instagram Email Family Home Crafty Recipes Goals Blog Roll PR

Saturday, December 31, 2011

14 Months? I Demand a Recount!

That's right, folks. C is 14 months old today. Strange, I could swear he just turned a year old. Please tell me that time doesn't go even faster after a year?! The first 12 months flew by fast enough!

Stats:
Clothing size: 12 -18 months depending on the brand
Shoe size: 4 - 5 depending on the brand

Words: Mama, Dada, tickle tickle, up (and reaches to be picked up), bubble, duck, high five (sounds like ha-fa! while giving a high five)

New tricks: Pulling up to standing, cruising on furniture, pointing out his belly, head, and nose when asked, and climbing the stairs.

Teeth: Sixteen. Eight on top and eight on the bottom. His eye teeth are just poking through, but boy are they making their way in. Its been rough, but he's a trooper!


Sleep: Through the night! Usually sleeps from about 7:30pm to 6:30am.

Favorite toy: At the moment, the play kitchen he got for Christmas. He loves all the food pieces and "stirring" in the pots and pans.

Favorite food: Um...everything. He's still a super great eater and loves everything from spicy to sour and everything in between.

Things that make me all sad because he's getting so big: He sleeps with his head on a pillow, he's transitioned from bottles to sippy cups, and when he comes home from daycare with art projects.

My little man really is growing up. Here he is a year ago today...


And now...


Here's to another amazing year, short man.

Wednesday, December 28, 2011

212 Things by 2012: Success!

We finished going through our closets, cabinets, and drawers and ended up getting rid of 221 items! The majority went downtown to the animal shelter's thrift store, the coats, hats, and other winter gear will go to the church, and we almost doubled the size of our yard sale pile for the spring.

I also put together a big bag of baby shoes, clothes, toys, and feeding stuff for a friend of mine with a little boy. There is only so much stuff one can save for future kids and we have plenty. Might as well share the wealth.

The totals were:
93 baby clothes, shoes, and toys
49 adult clothes
8 pairs of shoes
18 kitchen things
9 books/movies
24 general housewares
2 electronics
11 office things
and 7 random other things that didn't fit in any other categories.

J also has two huge boxes of books to sell, but we had them set aside already so they don't count in the great purge of 2011.

Truth be told, we could have probably kept going if need be. Maybe we'll do it again in the spring before our yard sale - I bet we could get another 212 things!

For 2012, we're instating some new "rules" that will hopefully prevent build up and waste in the future.
  1. For every book, piece of clothing, toy, etc. we bring into the house, an old one gets given away or put in the yard sale pile. 
  2. Using the "backwards hanger" trick to figure out what clothes we don't wear and can donate. Whatever clothes aren't worn by June 1st go. Repeat every 6 months.
  3. Found money (yard sale profits, tax return, etc.) goes to paying off debt and not to buying new things.
  4. Keep C's clothes organized by size/season so we can get rid of what we don't need and make sure he's wearing what he has.
  5. Keep up to date inventories of household items (tools, craft supplies, spices, etc. -- things you may not use every day) to prevent buying doubles.
  6. Don't just "go shopping" -- have a list and stick to it. 
Hopefully, this will save us space AND money while passing on our unneeded items to those who could give them a new life. Here's to a less wasteful and more spaceful 2012!

What are you doing differently in 2012?

Monday, December 26, 2011

212 Things by 2012: I Didn't Forget!


I know I haven't mentioned it in a while, but I haven't forgotten about my 2012 challenge. Get rid of (sell, donate, toss, etc.) 212 unneeded/unused things by 2012.

We started going through our closets and drawers this afternoon and quickly found 137 things that need to go. Most of it is baby things, books, and movies, but also some of our clothes and shoes, coats, and general housewares. The count so far is 74 things to donate, 61 to sell, and 2 to toss. Our yard sale pile is quite impressive at this point, but unfortunately we can't have a yard sale until the spring. I'm still counting that as getting rid of stuff since we'll donate whatever we don't sell.

Only 75 more things to find by the weekend!


Sunday, December 25, 2011

Merry Everything!

From our home to yours, Merry Christmas and Happy Hanukkah! I hope you had a wonderful day of family, friends, food, and fun!


Santa brought C a kitchen! His new challenge is learning to stand independently and squat to play (building leg muscles), so this kitchen fit the bill perfectly. It came with lots of pretend food and dishes and makes all kinds of fun sounds.
 
He is nothing short of obsessed with it. Good job, Santa.


So much so, he wouldn't put down the pieces to open other presents!


C insisted on helping Daddy make breakfast -- its hard to see in the picture, but that's a frying pan and spoon he's got in his hands mimicking J making pancakes. I about drowned in cuteness.


C also got a ball pit, which he doesn't quite understand yet, but I am pretty sure he'll be diving into it in no time. And did I mention I made C and J matching pajama pants with adorable cartoon moose on them? Cuz I did and they looked adorable, if you ask me. Hehehe


After a morning of pajamas, pancakes, and presents, we had dinner with family and enjoyed some good food and fellowship. I'd call Christmas 2011 a success. :-)

Saturday, December 24, 2011

My First iSpy!

A few months back, I discovered an awesome crafty blog called Obsessively Stitching. The woman who authors it has an amazing knack for whipping up neat, original projects from everyday items and scraps of fabric. One of these awesome projects is called an iSpy quilt.

An iSpy quilt takes scraps of novelty fabrics and puts them together into a fun iSpy game for kids. Plus, it looks so darn cool! A crib sized quilt takes 88 different 4" squares and while it is possible to collect all of them over time, you can also participate in iSpy fabric swaps which allow you to collect 200 different fabrics in a short amount of time and for little money.

Back in August, I participated in iSpy Swap #7 hosted by Obsessively Stitching. I got such a great starter stash! Colorful galoshes, crossword puzzles, butterflies, banjo playing bugs, school buses, Monopoly pieces, blueberries, letters, picnic ants, vintage cars, golf carts, turtles, cassette tapes, chocolate covered pretzels....the craziest array of prints I've ever seen!

No wonder this is addicting.

My first iSpy quilt was a gift for a friend's son and since its been received, I can finally post pictures of it. Excuse the bragging - this thing was my quilting pride and joy to date!

For this quilt, I used the disappearing nine patch pattern, which if you quilt and haven't tried - you must! It makes this pattern SO much easier to do than cutting out a bazillion sashing pieces and setting squares.

For this quilt, I used white sashing, red setting squares, and a bright green for the backing and binding. With so many colors and patterns on the front, you can't go wrong choosing colors for the rest.

And, drum roll please......I actually finished this quilt with binding!! I had this completely irrational fear of binding. It was crazy. I'd work on quilts for hours and hours and then turn and top stitch them. I know, I know - such a shame. Now that I've done it once, I have no idea what I've been afraid of.


I love this thing and I hope the little boy I gave it to does too. I absolutely love making baby/kid blankets and can't wait to make one for C. Right now I have plans for two - one regular iSpy and one made entirely of prints with black backgrounds (another inspiration from Obsessively Stitching).

Between this quilt project and the rest of my Christmas gifts and crafts, I've done a lot of this lately. Its been wonderful. :-) Cheers!

Thursday, December 22, 2011

Tasty Thursday: White Chocolate Chip Pumpkin Cookies

Here is another original J concoction for you this Tasty Thursday! J came up with these light, cakey cookies a few years ago when the holiday spirit hit him....and we had a can of pumpkin without a purpose. Enjoy!

White Chocolate Chip Pumpkin Cookies

Ingredients:

  • 1 cup butter, softened
  • 1 cup white sugar
  • 1 cup packed brown sugar
  • 2 eggs
  • 3 cups all-purpose flour
  • 1 teaspoon baking soda
  • 1/2 teaspoon salt
  • 2 cups white chocolate chips
  • 8 oz. canned pumpkin
Directions:

Preheat oven to 350 degrees F

Cream together the butter, white sugar, and brown sugar until smooth. Beat in the eggs one at a time. Combine baking soda, salt, and flour. Stir flour mixture into wet mixture. Once mixed, add pumpkin and stir until light and fluffy. Add white chocolate chips. 

Drop by large spoonfuls onto ungreased pans.

Bake for about 10 minutes in the preheated oven, or until edges are nicely browned.


Check out more yummy recipe ideas and more over at The How To Mommy's Tasty Thursday recipe swap blog hop!   

Wednesday, December 21, 2011

Wordless Wednesday: Charlie Reads the Paper


Don't mind the swollen eye. These pictures are from Sunday when he was still clearing up the cold and pink eye!

Tuesday, December 20, 2011

52 Weeks of Pinterest: Weeks 9, 10, & 11

Yeah, yeah, yeah....I'm a little behind, but I have been loving the Christmas crafts I've been finding on Pinterest! I have made several neat things as I prep for the holidays, but these were my favorite three.

This one isn't Christmas related, but still fun. I turned a nasty old cookie sheet into an activity tray for C. The original Pinterest pin converted the cookie sheet into a magnet message board, but this was more useful to us.
I painted the entire thing with chalk board spray paint, then glued scrapbook paper to the front to give it a little color. Though he's still a tad too young to really dive into the whole chalk thing, he loves magnets and they really help him practice his pincher grip (grasping things between his thumb and forefinger). Now he can play with his magnets without having to be in the kitchen.

When I started finding all of the ornament tutorials on Pinterest, I bought a few packs of glass bulb ornaments at Michael's - and am I happy I did! The idea of putting small items into one of the bulbs to create a custom ornament is so darn cool.

I filled this one with small crafty items that were just sitting around my craft room. Spools of thread from a travel sewing kit, buttons, pins, etc. A little yarn to hang it and it was ready to go. For another, I hot glued pearl beads to pretty lace and just shoved it all into the ornament. With a white ribbon tie, it looks so elegant! Who knew it took all of 10 minutes to make.

My absolute favorite ornament project, however, was the glitter floor wax ornaments. They are simply stunning and incredibly easy to make. The hardest part of the whole project was finding the darn floor wax!

In the tutorial, she uses Pledge floor wax, but I could not find that anywhere. The truth of the matter is that anything called "floor finisher" will work. You need it to dry clear and hard in order for it to work so a cleaner or polisher won't do. I found a brand called Quick Shine and it worked like a charm. The bottle cost around $6, but I used so little of it, I'll have it for years to come. Mooooore glitter ornaments!

For the glitter, I went to Michael's and after balking at the $6/jar cost of the Martha Stewart brand, found the store brand fine glitter for half the price. Add in some 50% off coupons and I was well on my way to some inexpensive ornaments. The colors I used were "cherry" and "emerald."
 It took me about 40 minutes to make a dozen small ornaments and four large. Then it took me another 15 minutes to clean up the glitter. If you have a funnel, use it. If you don't, get one before starting this project. Because remember...


The ornaments in the basket are for a gift exchange we're doing and the rest are either on our tree or wrapped up as other gifts. The pictures do them no justice and I'm not just saying that because I made them. The method of making them create this striking look to them that just pops when you put it on the tree. Love it!

Want some motivation to actually DO some of those neat projects you pin? Its never too late! Join the 52 Weeks of Pinterest challenge at Dutch Being Me!

Monday, December 19, 2011

Charlie Meets Charlie

For the past few years, our southern location has prevented us from attending the annual Christmas get together with our friends from college. Thanks to our recent move back north, we were able to attend this year!

Good food, good friends, an engagement (congrats Emmy & Jared!), and being able to see our friends George and Lisa before their little one is due next week! Geeze, we're all growing up, aren't we?

While this isn't the first time Charlie has been there, he was only 2 months old the last time we stopped on our way through town. This time, he got to hang out with another Charlie - a four legged Charlie. Charlie the Cavalier King Charles Spaniel (who you can visit via Lisa's blog) is an adorable, cuddly little guy who enjoyed playing with my two legged Charlie (and the container of puffs he was holding). They had a grand old time.

My Charlie also enjoyed trying to pull all of the ornaments off George and Lisa's Christmas tree. Thankfully, they were plastic and he couldn't really destroy them.


It was so incredibly wonderful to see everyone and hang out for a little while. Though I really miss Virginia sometimes, its days like this that make me so thankful that we got to move back north near family and friends. <3

Saturday, December 17, 2011

Operation: No More Bottles

You heard me right. C's New Year's resolution is to kick the bottle habit. I realized that C was only taking a bottle in the morning and at night with sippy cups in between, so why couldn't he just get a sippy all the time? He isn't particularly attached to his bottle and doesn't give a hoot whether we hand him a spout sippy, straw sippy, bottle, etc. Lets take advantage of this before he starts asking for a "baba" by name, shall we?

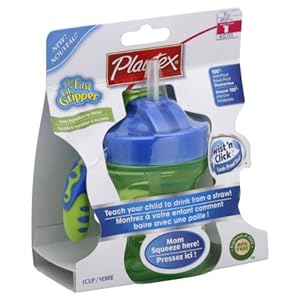
We originally had the Playtex First Little Gripper straw cup. You squeeze the bottom to teach your child that liquid comes up from the straw when they suck. It worked well to teach the concept, but we realized that in order to make it an easy straw and spill proof, there isn't a pressure release hole in the top of the cap. That means that after a suck or two, he has to release the suck to allow air back in. This made an absolute mess since he usually had water in his mouth when he did so. Again, great starter cup, but just not that great for a bigger kid trying to chug their cup.

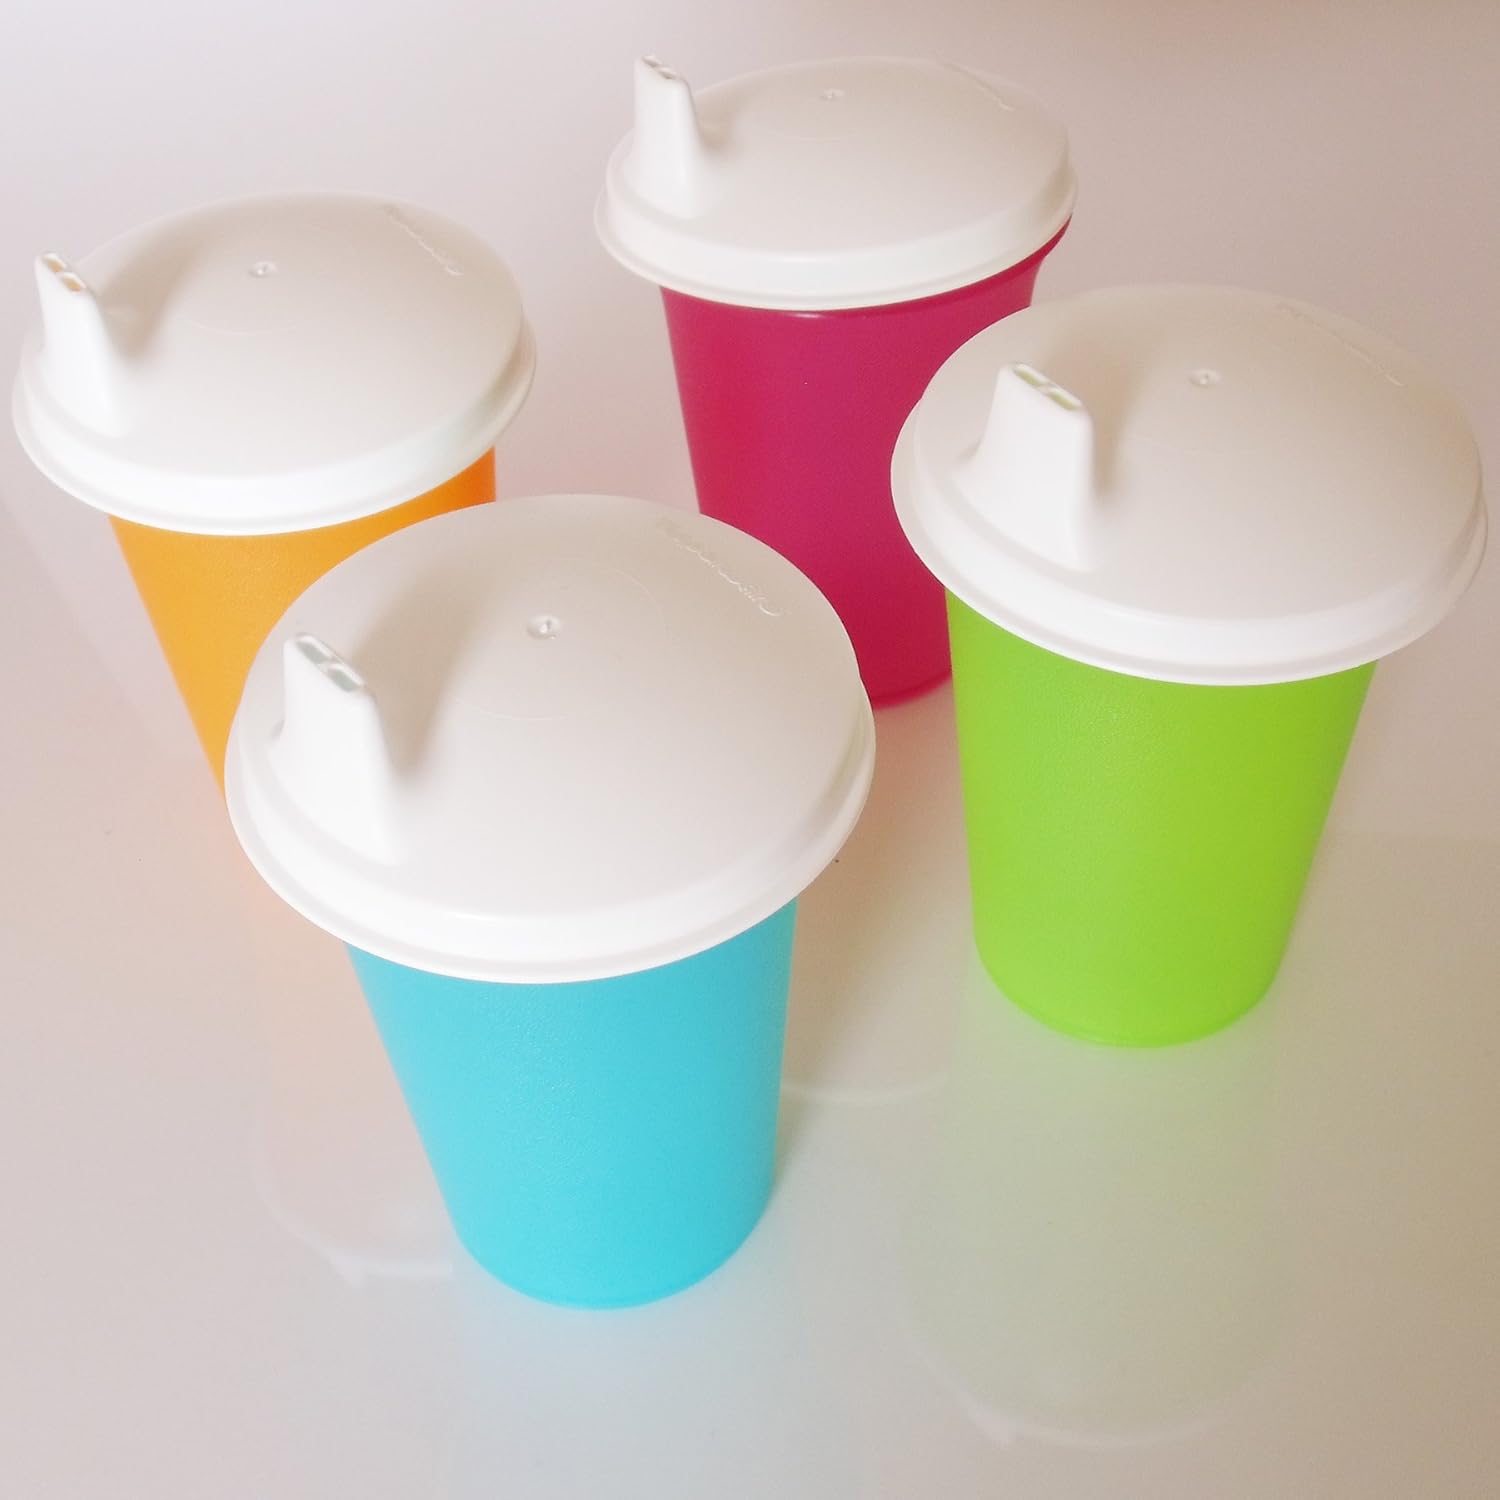
For a while there, we switched to a regular old fashioned Tupperware bell tumbler. The pros were that it was easy for him to drink out of and easy for him to hold. The cons were that it wasn't spill proof what so ever and he had a hard time understanding the "tip it back to get liquid" concept.

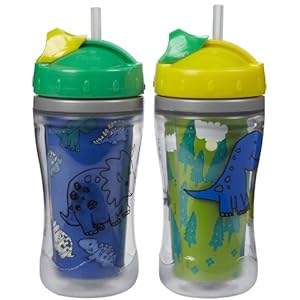
Yesterday, we ate dinner with friends of ours and I noticed their two year old had a different kind of Playtex straw cup. It was a big kid insulated version that was spill proof and had a pressure release hole. Basically - exactly what we were looking for. They let us try one out during dinner and despite his very stuffy nose, C was able to do really well drinking out of it! Once his nose clears out and he can drink continuously without having to stop and breathe, I really think he'll be set.

We ran out to Target today and picked up a set of our own (they're called Playtex Insulated Twist n Click Straw Cup). To my delight, there were actually several options of boy prints to choose from (Moms of boys know what I'm talking about) AND Target had a coupon for $2 off! They came to about $6 for two cups and we love them already. They really are spill proof, they are easy to hold, and most important - easy to clean. There is a slider on the top that closes off the straw for storage and it seems to be pretty darn leak proof. C has already subjected it to the incredibly scientific "throwing around the living room" test.

So, wish us luck. We replaced bottle #1 with a sippy tonight and he happily chugged away. Lets see how he does tomorrow with his breakfast sippy. Here's to an easy transition.


As a final note, if you are going to venture into the straw sippy cup world, do yourself a favor and buy one of these - a sippy cup straw brush. You'll thank me. :-)

Tis the season...

For a sick toddler. I apologize for the sudden hiatus; I have had a very long week of a sick kid, a sprained foot, and trying to close up campus for winter break. Yes. Long week.

Last Friday, C woke up with a bit of a fever. By Saturday, the fever evolved into a goopy eye, runny nose, and him tugging at his right ear. Off to the pediatrician we went! Acute ear infection, pink eye, and a script for Amoxicillin later, we were on our way home. Sunday, the fever continued and Monday he started tugging at his left ear. How a kid gets second ear infection and higher fevers while on antibiotics is beyond me. Apparently, Amoxicillin isn't his thing. 

He continued spiking 104 - 105.6 fevers for the next few days and despite two blood panels and a chest x-ray, we couldn't figure out exactly what was causing it. His doctor switched to Rocephin injections, which were brutal, but eventually helped. The fevers are gone and we're left with just a very runny nose. I'll take it.

Now, if you're a frequent reader, you may be saying to yourself, "Gee, it seems like C gets sick a lot." You'd be right. Since moving here in August, he's had a few colds, croup, impetigo, viral pneumonia, ear infections, pink eye, and now this mysterious virus that kicked his butt for a week. Maybe its because he was a preemie, maybe its because he goes to a huge daycare center, and maybe he's just got a crappy immune system. Either way, we already do vitamins, hand washing, and toy sanitizing, so I guess we'll just hope its not a bad winter.

The good news is that he's feeling much better. So much so that he felt like repurposing his bib into a cape. That's my boy.

Thursday, December 8, 2011

Tasty Thursday: Gingerbread Cookies

My holiday favorite is iced gingerbread cookies. Mmmm Soft, spicy gingerbread with crunchy, sweet royal icing is about as good as it gets, folks. Love 'em or hate 'em, nothing says Christmas like gingerbread cookies. Here is the recipe I used and tweaked a bit:

Gingerbread Cookies

Ingredients:
  • 1/2 cup butter
  • 1/2 cup sugar
  • 1/2 cup molasses
  • 1 egg yolk
  • 2 cups sifted all-purpose flour
  • 1/2 teaspoon salt
  • 1/2 teaspoon baking powder
  • 1/2 teaspoon baking soda
  • 1/2 teaspoon ground cinnamon
  • 1 teaspoon ground cloves
  • 1 teaspoon ginger
  • 1/2 teaspoon ground nutmeg
Directions: 
In a large bowl, cream together the margarine and sugar until smooth. Stir in molasses and egg yolk. Combine the flour, salt, baking powder, baking soda, cinnamon, cloves, ginger, and nutmeg; blend into the molasses mixture until smooth. Cover and chill over night (or at least 2 hours).
Preheat the oven to 350 degrees F. On a lightly floured surface, roll the dough out to 1/4 inch thickness. Cut into desired shapes with cookie cutters. Place cookies 2 inches apart on ungreased cookie sheets. 
Bake for 8ish minutes in the preheated oven, until firm. Remove from cookie sheets to cool on wire racks. Once cool, decorate! The recipe easily made 3 dozen cookie cut outs.
For the royal icing, I followed Alton Brown's recipe because well, he knows everything and I trust him with my cookies. 
For the gingerbread men and snowmen, I made faces and buttons and all that good stuff. For the stars, I tried my hand at flooding them with icing and it worked really well! I used this tutorial from Cake Journal. Super easy and SO good! 
Here is the super secret tip - for some magical, unknown reason the cookies taste markedly better the next day. If they last that long. ;-)