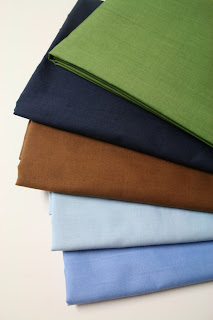
Depending on how many colors you have and how long you want your flag strips to be will dictate your fabric needs. For this tutorial, 1/2 yd. of each color and an additional 1/4 yd. for binding strips (the long strip the flags are attached to) yielded 15 flags and approximately 4 1/2 yds. of binding.
(PSA: Broadcloth is on sale for $2.50/yd this week at JoAnn's. Also, here are some coupons for you. Hooray!)

To start, you'll need to create a pattern. For this, I took card stock and folded it in half longwise (like a hot dog, if you will). From there, I measured from the outside corner to 10" down the folded side. This will create a triangle flag that is 8 1/2" across the top and 10" down the sides. You can easily adapt this to fit your needs.
Now that you have your pattern, iron and prep your fabric to be cut. I had five yards (one of each color) and cut a piece about 14" x 1 yd. from each to use for this project.
Here is a bonus tutorial to sure up the sides of long pieces of fabric. Take your long strip and lightly fold it over its self until its a manageable size. Line up the guide, and cut through all layers of the raw sides with your rotary cutter. Magic! No more cutting a section, repositioning the fabric, cutting the next section, repositioning the fabric....nothing ends up straight that way.
Next, fold each strip into even thirds. This will allow you to quickly cut out six flag pieces from the strip rather than cutting them out one by one. With the pattern and rotary tools, cut out one set of flags. Using the remaining straight edge, line up the pattern again and cut out another set of flags. Do this for all colors.
Time to break out the sewing machine! Match up flags in pairs (either the same fabrics or coordinating ones!) and with right sides together, sew down both long sides leaving the top open. Snip into the bottom without cutting any stitches to allow for a point when you turn it.
If you're like me, sew through two flags then stop and refill your bobbin because you neglected to check it before starting. *sigh*
When finished sewing, trim threads, turn each flag inside right, and iron flat. I use a large gauge knitting needle to push the bottom out to a nice sharp point. If you do this, be careful not to push through the fabric!
Next, its binding time! You have two options for this part; you can either buy pre-made binding or you can make binding. I'm cheap and already had the fabric, so I decided to make my own. I'm not, however, going to reinvent the tutorial wheel. I absolutely love this binding tutorial at Crazy Mom Quilts and I hope you do too. The only difference is, in her tutorial, she's making thinner binding for a quilt. Instead of cutting strips 2.25" wide, I cut strips 4" wide. This makes for 1" wide continuous double binding.
 Now that you have your flags and beautiful binding, its time to put it all together. With a ruler/measuring tape on hand, open the binding, insert the flags, and pin them in place. I made 2" gaps between the flags, but you can easily make it more or less.
For the ends of the binding, fold in the raw edge and pin in place to sew later.
Once all flags are pinned into the opening of the binding, sew across the top with coordinating thread (or contrasting for a fun effect). Instead of making one super long strip of bunting, I made one long and one short. Oooooh fancy.
Hanging tips:
 Use tape to temporarily put the bunting in place until you're happy with its position. At first I nailed it right in and had to pull it out when I didn't like the look. Tape made it much easier to readjust it a thousand times.
 I used small finishing nails to hang it. That way, there was no fear associated with putting it above C's crib. That wall will come down before the bunting does.
If your material is dark, like mine is, use a permanent marker to color in the silver finishing nails. Even if it doesn't match perfectly (I used black marker and navy blue fabric) it'll hide them from far away.

Ta Da! Your beautiful bunting is finished and hung. Bunting is a simple, pretty way to decorate a kid's rooms and just about any celebration out there. Not all bunting needs to be fabric either; quick bunting can be made of paper for things like backyard parties, weddings, and birthdays.


I've always wondered how to make these! They always look so cute as party decorations, and very cute in that room!
ReplyDelete